
This Halloween, transform your looks into a haunting vision with skull makeup that’s shockingly simple to create! Dive into our guide about Halloween skull makeup and unlock the secrets of an iconic, spine-chilling look.
Are you ready to master Halloween skull makeup with ease? Halloween skull makeup is a spooktacular makeup technique that can make you stand out for your next Halloween event. In this article, you will learn how to master Halloween skull makeup correctly, with step by step details on how to do skeleton makeup, apply it properly, as well as what makeup tools can be used to ensure that you look your best!
Key points:
- Learn about the essential tools and products for perfect Halloween skull makeup.
- Step-by-step guide to achieving symmetrical teeth and flawless outlines.
- Tips for adding depth with shades and shadows.
- Explore various skull styles, including traditional, melting, and neon.
- Uncover what final touches you can use to aid your Halloween skull makeup look.
Gathering Your Makeup Kit For Halloween Skull Makeup
Creating a stunning skeleton makeup look doesn’t have to be an expensive process. Most of the essential items for achieving an eerie yet elegant skull appearance are likely already in your Ben Nye SFX kit.
Here’s what you’ll need for an effective skull easy Halloween makeup:
- Mehron Paradise Makeup: Available in essential black and white, Mehron Paradise face paints are a staple for any skeleton makeup look. They’re water-activated, making them simple to apply and remove. While they may need touch-ups for long-lasting wear, their affordability and quality make them a top choice for various makeup routines.
- Black and White Eyeshadow: Opt for matte finishes to improve your skull makeup. Brands like Ben Nye offer fantastic eyeshadows that help in creating depth and shadow effects essential for a skeleton look.
- Makeup Brushes: Choosing the best makeup brushes for your set is crucial, as they help cover larger areas and define sharp lines around the face. Consider investing in a shadow switcher tool to easily switch between colours without needing multiple brushes.
- Eyeliners: A black liquid eyeliner is perfect for defining intricate details such as the teeth and nasal cavity. A black pencil liner will be useful for softer shading and blending around the eyes and contours.
- Setting Spray: To ensure your makeup lasts throughout the night, use a high-quality setting spray like Ben Nye or Mehron. This will keep your makeup intact and prevent smudging.
- Extras: While not necessary, adding fake lashes can elevate your skeleton makeup ideas, giving your look a dramatic flair.
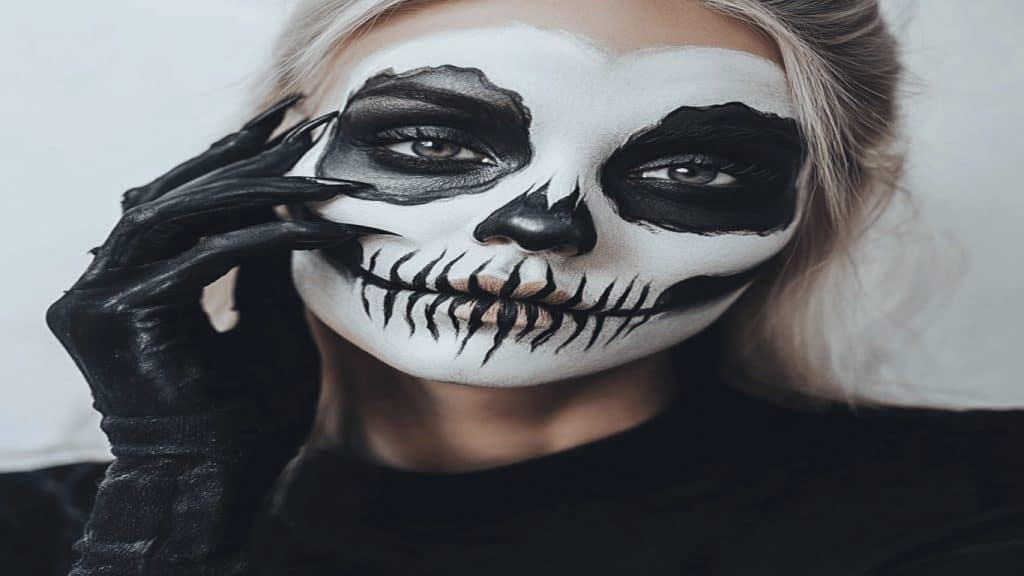
Step-by-Step Guide Skeleton and Skull Makeup Guide

Here’s your detailed process on how to apply skull makeup correctly so that you can look your best for the next upcoming Halloween event:
1. Base Application:
Start by neutralising your natural features to create a smooth base.
Using a glue stick, flatten your eyebrows against your skin, and set them with a light dusting of white baking powder. This will ensure a seamless surface for the makeup application.
Next, choose either a black liquid eyeliner or the trusted Mehron black paradise paint, and with a fine brush, start sketching the foundational shapes of your skull makeup.
Focus on the jawline, cheekbones, eyes, and nasal area. For the jaw, an elongated ‘S’ curve works well, extending from your hairline and curving neatly around to the edge of your lips.
Drawing the nose requires a couple of wide, tapering triangles to darken the nostrils effectively, providing a stark contrast that’s essential for a dramatic skull appearance.
2. Drawing the Skull’s Structure
With a lip pencil, preferably a neutral shade, lightly draw guidelines following your facial bone structure.
This technique helps in maintaining realism and symmetry, which are crucial for a convincing skeleton makeup look. These guidelines will act as a map for the more detailed work to come, ensuring each feature aligned correctly with your natural anatomy.
3. Crafting the Teeth
The teeth are a central feature in any skull makeup and require careful attention to detail.
Start by outlining the top and bottom arches of your mouth with semi-circular strokes to form the individual teeth, using a white paint for a bold, eerie effect. You can use Mehron Tooth FX for this exercise.
A flat brush is ideal for this, as it mimics the natural shape of teeth, allowing for more precise application. After painting each tooth, add a dark root extending towards the chin to aid the ghastly effect, making each tooth appear as if it’s floating within the dark recesses of your skull.
4. Colouring the Major Areas
It’s time to bring your skeleton makeup ideas to life with bold colours.
Start with Mehron Clown White Paint to fill in the broader areas of your face, avoiding the sections around the eyes, nose, and cheek hollows—these will be shaded in later for dramatic effect.
Use a large, flat foundation brush to apply the white paint smoothly across your forehead, along your jawline, and around your nose, carefully avoiding overlapping into the defined areas of the teeth.
Switch to the black Mehron paint to darken the eyes, nostrils, and the area beneath the jawline, sharpening these features to enhance the skull-like appearance. Fill the hollows of your cheeks partially, blending outward towards the teeth. The contrast between the black and white paints will start to bring your Halloween skull makeup into stark relief.
5. Refining the Teeth
With precision, fill in the teeth using the same Clown White Paint. To ensure the paint doesn’t smear, dust each tooth with setting powder. This step is crucial for maintaining the sharp, eerie appearance of each tooth, making them stand out against the darker areas of the makeup.
6. Additional Black Detailing
Use the black paint from the Mehron Paradise Makeup AQ 8 Colour Palette to add depth to the smaller, intricate areas of the skull makeup. This will provide a layered effect, adding to the realism of the skull.
7. Outlining
Detail the edges of the teeth with a fine Paradise liner brush round 811 AQ. This precision tool is perfect for drawing clean, sharp lines that define the teeth against the skull’s white base.
8 Adding Shadows
Improve the skull’s dimensional look by applying darker shades. Carefully shade around the teeth and extend these darker colours upwards to create a hauntingly realistic appearance.
9. Deepening the Details
Continue using the aforementioned dark shades to add shadows around the eyes, nose, and brow areas.
This technique helps in creating a more pronounced skeletal effect, giving your skull makeup the necessary depth and intensity.
10. Highlighting Key Features
Finally, revisit areas needing highlights—especially around the teeth and eyes—with Mehron Clown White Paint. This step brings forward the essential features, making them pop and providing a stark contrast that is visually striking.
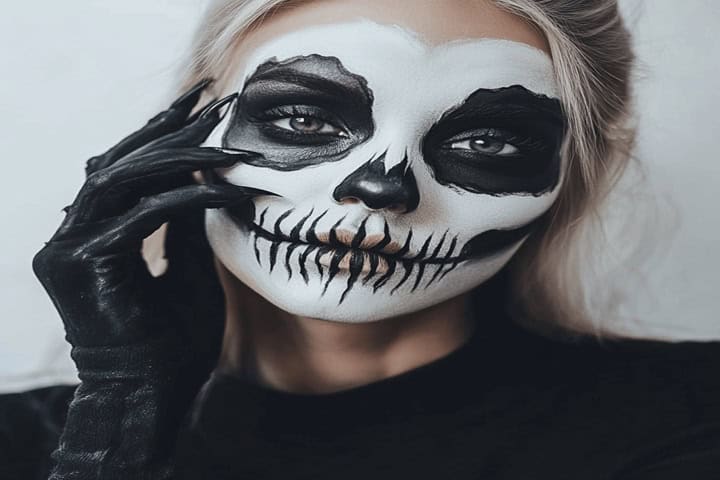
Final Look
Your skull makeup is now complete! You’re ready to impress and spook with a professional-level skeleton look this Halloween. Step out confidently knowing your skull makeup not only looks terrifying but is crafted to last all night long.
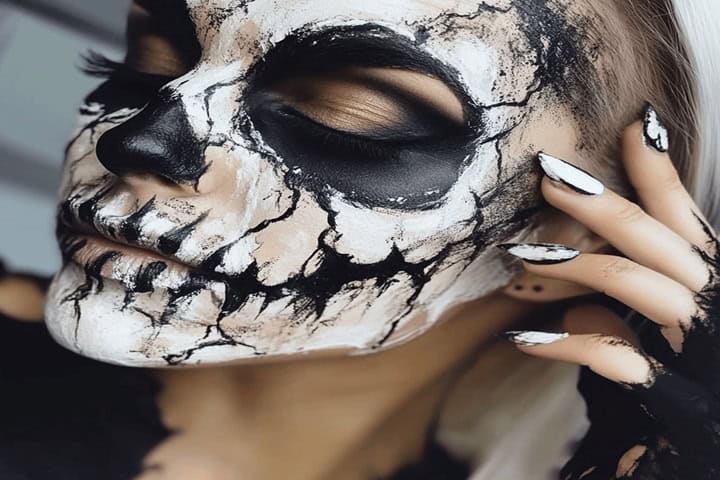
Halloween Skull Makeup Looks To Try
Are you interested in experimenting with your Halloween skull makeup looks? Try some of these ideas for inspiration:
1. Classic Ghoul

No Halloween ensemble is complete without the eerie presence of a Ghoul. Use these makeup tips for an effective classic ghoul aesthetic:
- This iconic look starts with a smooth base using primer to create flawless skin.
- A bright primer layer follows, setting the stage for a ghostly pale complexion.
- Use deep purple and silver shimmers to emulate sunken, haunting eyes.
- Employ a thick black eyeliner to define a dramatic wing, then blend in a matte violet shadow from the brow down to the lid, accented with silver highlights in the inner corners for a spectral effect.
This setup not only deepens the eyes but also brightens the brow bone with a vivid contrast, readying you for a spooky night out.
2. Beautiful Lady-Dracula
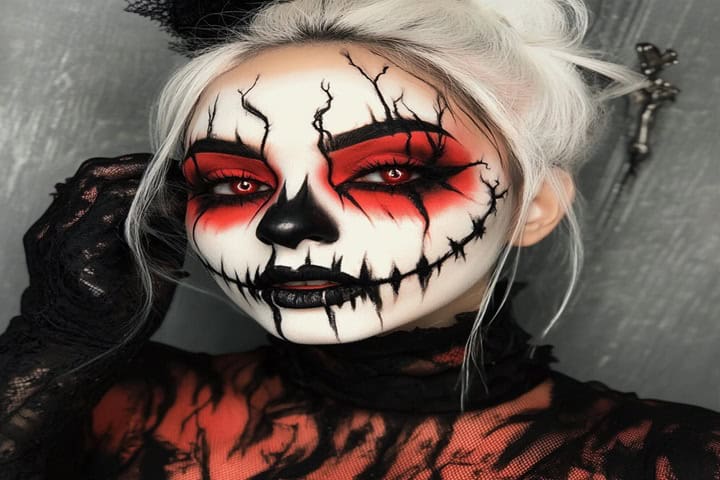
Dive into the dark allure of the Lady-Dracula.
- Start with a light application of diluted white paint for a deathly pallor.
- Use a colour-changing liquid eyeliner to give your eyes a mysterious, otherworldly look, elevating this with strategic lines and white rhinestones below the lower lash line for an ethereal glow.
- A swipe of pink blush along the cheekbones and brows adds a hint of life to the otherwise undead visage.
- The look is completed with a bold, blood-stained red lipstick, perfect for embodying the vampiric charm. Choose to make your dracula even more realistic with some fake blood.
3. Neon Skull
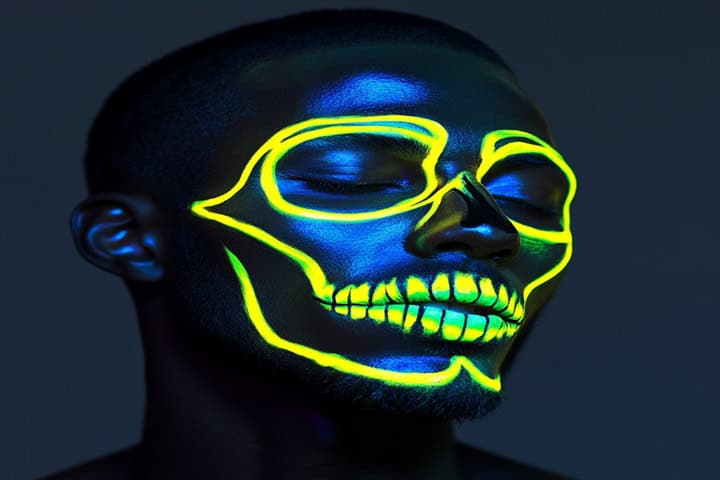
A vibrant twist on the classic skull, this neon makeup requires a palette of bright, fluorescent colours.
- Start with lighter shades on the upper parts of the face, gradually blending into yellows and greens around the central facial features.
- Outline the teeth and jawline in bold black, and then layer blue around the lower chin and neck.
This method not only brings a modern vibrancy to your Halloween look but also ensures you stand out in the darkest of nights.
Do you wish to catch everyone’s attention at the next party? Try these neon makeup looks.
4. Eerie Butterfly
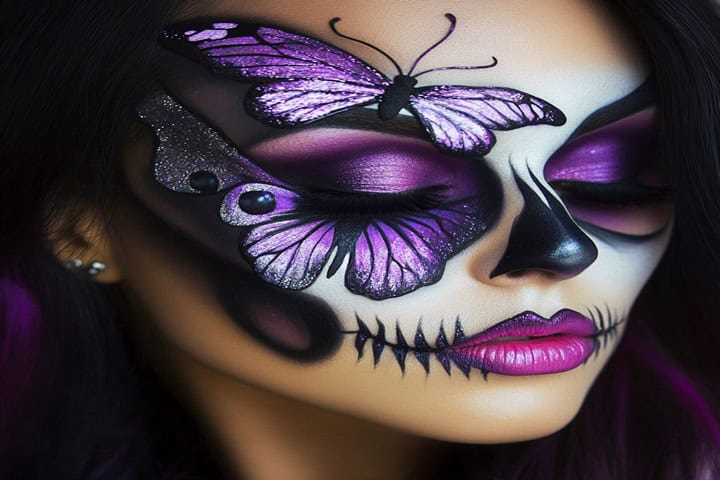
Finally, for a unique take, consider the eerie butterfly.
- Apply a bright foundation as a base, then use violet and silver shadows to craft wings that span from your eyes across the cheeks.
- Each detail, from the shimmering eyelid to the carefully drawn antennae, adds layers to this captivating look.
- Accentuate with a bright pink blush and fuchsia lips for a stunningly spooky butterfly effect ready to flutter into any Halloween festivity.
Our zombie makeup kits are a great way to create an easy halloween look, as we offer everything you need to be as scary as possible!
Choose Treasure House of Makeup for Quality and Performance
As a lead distributor of stage makeup, we are happy to help with any enquiries that you may have in regards to skull makeup. Feel free to contact us now to see how we can help, and ensure that you can make your halloween makeup as perfect as possible.
We also have a wide variety of makeup tips on our blog that cater towards different makeup purposes, from how to apply for the stage to various makeup practices, including:
- How to contour face
- Primer or moisturiser first?
- Sweat proof makeup
- How to make SFX prosthetics for the face
And if you are looking for more guides for Halloween makeup, try these for inspiration:
In conclusion, for those searching for a useful Halloween skull makeup guide, this article provides the only guidance you need in order to create a spooky and effective skull makeup look. From the chilling Classic Ghoul to the vibrant Neon Skull, there are plenty of options that you can adopt to create the perfect look using makeup that professionals and amateur artists adore to use.
So what are you waiting for? Get crafting and prepare to steal the show at the next Halloween event!
You want to try more experimental, spooky looks? Explore these Halloween makeup ideas, ranked easy to hard!
FAQs
How long does it take to apply Halloween skull makeup?
Are there any common mistakes to avoid when doing skull makeup?
Do I need special tools for detailed skull makeup?
Sources
Harrow, S., (2024) Neon Makeup Looks: 22 Best Colours for a Dazzling Display. It’s a Beauty Thing. [online] Available at: https://www.itsabeautything.co.uk/neon-makeup-looks/ [accessed 19/08/24]
Colville, C., (2023) 10 Halloween Makeup Ideas, Ranked From Easy To Hard. Country & Town House. [online] Available at: https://www.countryandtownhouse.com/style/health-and-beauty/halloween-makeup-ideas/ [accessed 19/08/24]


Hey there! I’m Isabelle Kerrington, and I’m thrilled to share my passion for the performing arts through my blog. Focusing on theatre makeup, my posts will cover everything from product recommendations to helpful tips and engaging tutorials. Join me on this exciting journey as we explore the magical world of theatre makeup together.