Bruise Colours: How to Apply Bruise Makeup Kits For The Stage
17th March, 2025

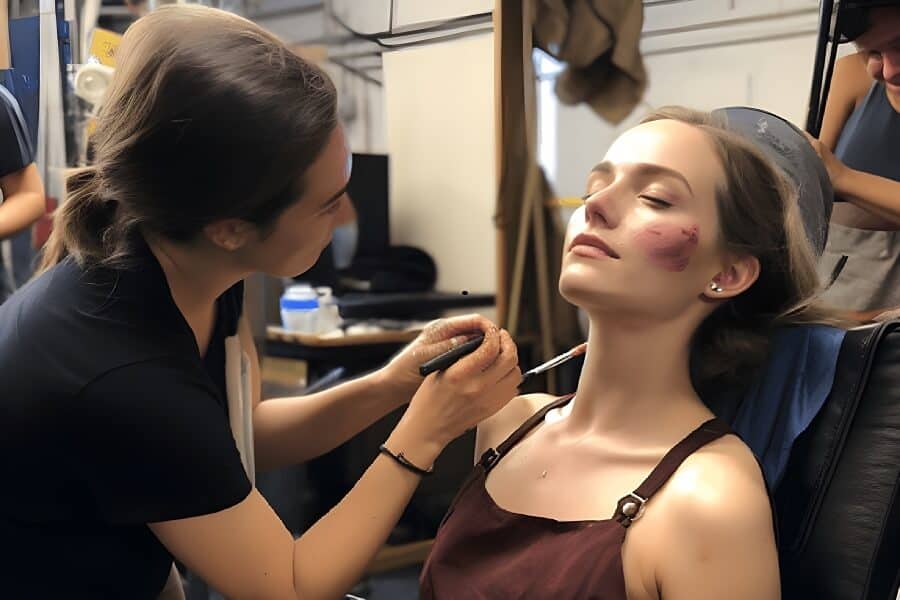
Bruise kit makeup is a valuable tool to have in your makeup kit for stage makeup artists, offering a lifelike representation of injuries, from fresh traumas to their healing stages. In this article, you will learn about bruise colours, trauma makeup, what a bruise kit is, and techniques towards applying bruise makeup effectively.
What is Trauma Makeup?
Trauma makeup involves simulating bruises, wounds, and other skin injuries. It requires colour blending for bruises and using different stage makeup materials like gelatin or liquid latex for raised effects or glue for prosthetics. As a stage makeup artist, you will be expected to craft lifelike injuries, such as bruises, cuts, scars, and burns, all of which fall under the category of trauma makeup.
For more latex related makeup needs, why not learn about what is spirit gum.
What is a bruise kit?
A bruise kit is a specialised makeup product that comes with a wheel of varied colour palettes, including shades like red, burgundy, violet, purple, yellow, and sallow green. These colours are designed to closely resemble the natural hues seen in bruises and skin abrasions.
Application is versatile; you can use a sponge, your fingertip, or a makeup brush to apply the makeup. For a more personalised touch, the colours can be blended together to create unique shades.
To craft a realistic bruise with the kit, we advise you to first determine the age of the bruise that you are trying to mimic. For a fresh bruise, red shades are ideal. As the bruise matures, introducing purple tones can depict its ageing process. The darkest shades in the kit are perfect for areas where blood would naturally accumulate beneath the skin.
When a bruise reaches its peak, blue shades are the best choice. And as the bruise starts to heal, the yellow and green tones are useful to emphasise recovery.
What to Ask Yourself about Bruise Colours
If you are playing someone on the stage that has become bruised and you want to ensure that detail is prominent in the performance, then be sure to ask yourself the following questions.
What caused the bruise?
Bruises usually appear where the impact occurred. The shape of the bruise often mirrors the object that caused it. For instance, if someone is hit with the end of a baseball bat, the resulting bruise would be large and resemble the bat’s end. Therefore, you want to emulate the shape of the item that contacts the body in terms of size and scale.
When was the incident that caused the bruise?
If you are playing someone on stage that has been in a fight, expect to create bruises to have red and blue shades. Remember, as bruises heal, their appearance – in terms of shape, size, and colour – will change. For extra colour, you can also add products such as body paints to make the bruise more realistic.
How hard was the impact?
Vehicle-related bruises differ from those of a fistfight. A hard impact on sensitive areas over bones, like the cheekbone, can cause the skin to tear. For an authentic look, search for reference images on Google images, and search for terms such as ‘bruises from car crash’, depending on the incident you want to depict in your performance.
If you would like to imitate a hard impact around the mouth or a busted lip, use tooth paint to mimic chipped or knocked out teeth.
How to Use a Bruise Kit
1. Materials Assemble
First, gather your materials. Using cruelty free palettes from brands like Ben Nye, Kryolan and Mehron will provide the best results when establishing your bruise kits. Consider getting a Mehron bruise kit wheel if you want to get all of the best bruise colours in one go.
Makeup sponges are also crucial. While orange and black sponges are ideal, a face smoothie sponge can be used for a finer texture whilst also working around the shape of your face.
2. Covering recent bruises
For a fresh bruise, start by setting the area with prime red using your textured sponge. Add deeper red shades, followed by subtle blue and purple tones. To merge the colours, use a clean textured sponge moistened with alcohol and lightly stipple across the area. Ensure that the bruise looks like it’s under the skin rather than just on the surface.
3. Day old bruises
Start by adding a thin layer of prime red on the area. Add multiple dense layers of deep red, blue, and purple using textured sponges, then set with powder.
4. Beginning to heal bruises
For bruises starting to heal, apply a yellow base with a textured sponge. Introduce streaks of yellow-green, followed by deep red, purple, blue, and reddish-brown shades. Finish with powder.
5. Healing bruises
For bruises further in the healing phase, blend together softer tones such as green and yellow. Add lighter tones of brown, purple, blue, and red. As healing progresses, red, purple, and blue shades fade, leaving more yellow and green until the bruise vanishes.
Are you interested in tattoos but don’t want to dedicate? Here is how to remove (and apply) temporary tattoos.
How to Create a Realistic Bruise using Theatre Makeup
The guidelines provided are suitable for all skin types. For darker skin tones, replace the mentioned yellow with a rich golden hue.
Fresh bruises: distinctive features
Fresh bruises are characterised by vivid colours. Begin by lightly applying yellow cream to the desired area using a sponge or finger. Layer with a mix of violet and navy creams. Asymmetry enhances realism, so get creative. Emphasise the most impacted areas with maroon shades. Using a sponge can mimic broken blood vessels, especially noticeable around the eyes.
Transitioning bruises: merging fresh and healing
Mid-stage bruises blend the vibrant colours of fresh bruises with the muted hues of healing ones. As the bruise heals, yellows and browns emerge while maroons and navies fade. Opt for soft brown shades, akin to gentle shadows. Intersperse with light navy or violet patches, ensuring the overall colour remains subdued.
Bruises nearing recovery
As bruises heal, their colours soften. A nearly healed bruise showcases fading browns and yellows. For stage visibility, start with a dense layer of yellow cream makeup. Contour to give depth to the diminishing injury. Introduce brown spots and blend thoroughly for a genuine, fading bruise appearance.
@jaclynforbes how to: fake bruise 🟣 with makeup! what do you wanna learn next? #sfxmakeup #fakebruise #filmtvmakeup #promuatip #bennye #bruising #blackeye
How to Create Bruises, Cuts and Grazes With Theatre Makeup
The art of stage makeup often involves simulating injuries, like cuts from sharp objects. The key to authentic-looking cuts? Imperfection. For the most realistic effect, apply on curved areas like the nose, cheeks, or lips. Since Ben Nye makeup distributes products for the stage, screen as well as everyday use, you will find their products to be the best fit for your bruise kit theatre makeup purposes. Here’s a 6-step guide to achieve this:
Step 1: Mimic Irritation
Skin reddens when irritated. Start by brushing a thin layer of pink cream makeup on the intended cut area, extending slightly beyond it.
Step 2: Define with Shadow
With a dark brown or black eyeliner pencil, sketch the cut. Ensure it’s bold enough for stage visibility. Aim for an uneven, jagged appearance, even if the cut is straight, to simulate a rough injury. This line serves as both shadow and the cut’s outline.
Step 3: Fill with Red
The space between the dark lines represents the open wound. Fill this with a blood-red shade, keeping within the defined area.
Step 4: Blend for Depth
Using a small brush, smudge parts of the dark line outward. Avoid uniform blending; irregularity adds to the realism.
Step 5: Add Highlights
Lightly highlight the outer edges of the dark line. This gives the illusion of raised skin around the cut, adding depth.
Step 6: Finalise with Blood
For a fresh wound look, dab fake blood within the wound. Consider the natural flow of blood from the injury, marking its path with smears or droplets.
Create Effective Bruises With Our Bruise Kits
In conclusion, in order to create effective action set pieces on the stage and screen that will deliver lasting consequences throughout the performance, bruise kit makeup is an essential tool for stage makeup artists to have in their tool kits. Bruise kit makeup enables the realistic portrayal of injuries from fresh wounds to healing bruises. With a blend of colour theory, technique, and expert tips provided by us, anyone can master the art of theatrical injury simulation, enhancing the realism and depth of stage performances.
FAQs
Do you put concealer on a bruise or foundation?
What is the best bruise covering makeup?
- Colour-correcting concealers: These are used to neutralise the colours of the bruise. For example, a yellow or peach concealer can help counteract purple or blue tones, while a green concealer can help neutralise redness.
- Full-coverage foundation: This helps to blend the concealed area with the rest of the skin.
- Translucent setting powder: This ensures that the makeup stays in place throughout the day.
- Some popular brands known for their high-coverage products include Dermablend, Kat Von D, and MAC. However, the best product can vary based on individual preferences and skin type.
How does bruise colouring work?
- Red: Initially, a bruise may appear red because of the fresh blood under the skin.
- Blue or dark purple: Within a day or so, the bruise will darken to blue or purple due to the lack of oxygen in the area.
- Green: As the haemoglobin breaks down further, the bruise may turn green.
- Yellow or brown: In the final stages of healing, the bruise will turn yellow or brown as the body continues to break down and reabsorb the haemoglobin.
- The exact timeline and colour progression can vary based on factors like the severity of the injury, the individual's age, skin tone, and overall health.
Sources
Townsend, D.C., (2019) Foundations of Stage Makeup. Color & 5 B/W Illustrations. Routledge. ISBN 9781138595019. [online] Available at: https://www.routledge.com/Foundations-of-Stage-Makeup/Townsend/p/book/9781138595019 [accessed 28/09/23]
Hey there! I’m Isabelle Kerrington, and I’m thrilled to share my passion for the performing arts through my blog. Focusing on theatre makeup, my posts will cover everything from product recommendations to helpful tips and engaging tutorials. Join me on this exciting journey as we explore the magical world of theatre makeup together.